Last Updated on
Mastering WordPress Widget Area To WordPress
WordPress is more than just a blogging platform; it’s an open-source universe of customization that can make your website genuinely unique—among these customizable features is adding a widget area to WordPress. The website header can dramatically alter the look and functionality of your site. Here, we provide a detailed guide to adding widgets to your WordPress site header and how it can transform your site’s user experience.

What are WordPress Widgets? The Basics
WordPress widgets are a fantastic way to add functionality and design flair to your website. Small blocks of content can be added to your WordPress site’s various sections (or “widget areas”), like the sidebar, footer, and header. Widgets can include everything from social media feeds to search bars, and adding them to your title can give visitors quick access to critical features.
Step 1: Accessing your WordPress Dashboard
Before adding a widget, you’ll need to navigate to your WordPress dashboard. Log in to your WordPress site and access the dashboard via the admin menu. It’s your command center for managing everything related to your WordPress site.
Step 2: Locate the Widgets Section
Once you’re in the dashboard, you’ll find the ‘Appearance’ tab on the left-hand side. Hover over this, and a dropdown menu with the ‘Widgets’ option will appear. Click on ‘Widgets’ to enter the widget management area.
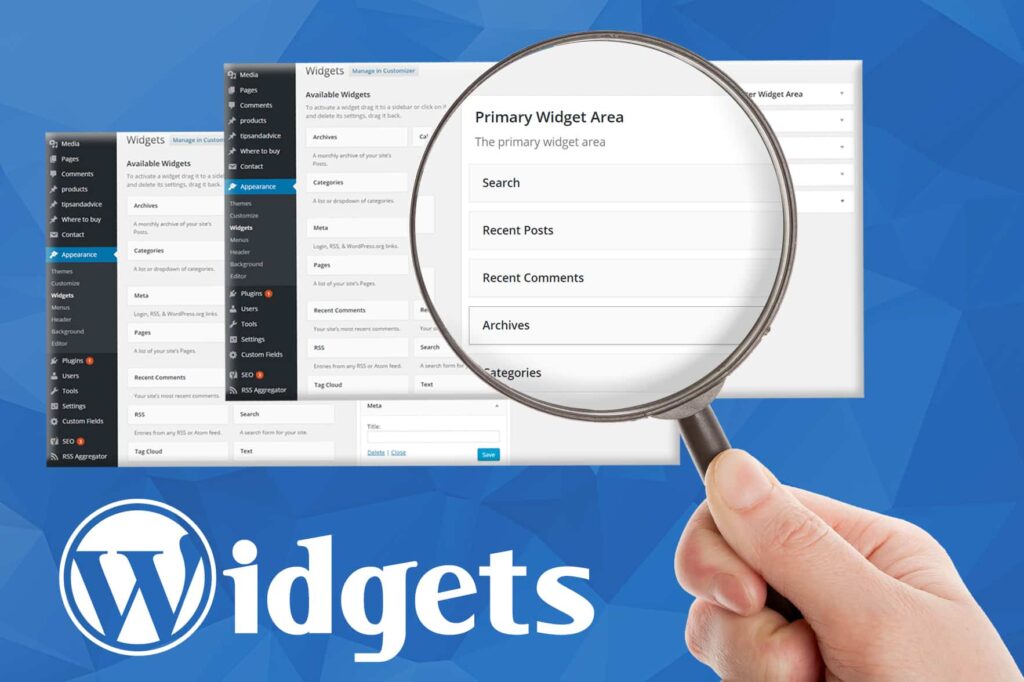
Step 3: Understanding the Widgets Area
On the Widgets page, you’ll see two primary sections. On the left is a list of available widgets you can add to your site. On the right are various widget areas where you can place these widgets. If your theme supports header widgets, you’ll see a section labeled ‘Header’ or something similar.
Step 4: Adding Widgets to Your Header
To add a widget to your header, locate the widget you want to add from the available devices on the left. Click, drag, and drop the device into the ‘Header’ widget area on the right. Once you release the mouse button, the device will be placed in the header widget area.
Step 5: Customizing Your Widget
Now that the widget is in the header area, you can customize it to fit your needs. Click the downward arrow next to the widget’s title to expand the options. These options vary depending on the device but may include title, content, and display settings. Adjust these as necessary, and click ‘Save’ to save your changes.
Step 6: Preview and Publish
Before making changes live, you’ll want to preview them to ensure they look and function as expected. You can do this by navigating to your site while still logged into WordPress. If you’re happy with your changes, head back to the widget area and click ‘Publish.’
An Alternative: Using a Plugin
If your theme doesn’t support header widgets or you want more control over your header’s layout, consider using a plugin like Widget Options. This powerful plugin adds extensive widget placement and customization options to your WordPress site.
Final Thoughts
Whether building a personal blog, a business site, or an online store, adding widgets to your WordPress header can significantly improve your site’s functionality and design. It’s a simple yet powerful way to personalize your site and enhance visitors’ experience.
Ultimately, adding a widget to your WordPress header may seem like a small change, but it can have a significant impact. With this guide, you’re now equipped with the knowledge to harness the power of widgets, transforming your site header into a unique, functional, and appealing digital gateway.
FAQs
How do I add a widget area in WordPress?
To add a widget area to your WordPress menu, you can follow these steps:
- Install and Activate a Plugin: To add a widget area to your WordPress menu, you must use a plugin that provides this functionality. One popular plugin that can help you achieve this is the “Max Mega Menu” plugin. Install and activate the plugin from the WordPress Plugin Directory.
- Create a Widget Area: Once the plugin is activated, go to “Appearance” > “Menus” in your WordPress admin dashboard. You will see a new tab called “Widget Areas” in the menu editing interface provided by the Max Mega Menu plugin.
- Click on the “Widget Areas” Tab: In the menu editor, click on the “Widget Areas” tab to access the widget area settings.
- Create a New Widget Area: Click on the “Create a new widget area” button to add a new widget area to your menu.
- Configure the Widget Area: Name your widget area and choose its location within the menu. You can also set a custom class if needed.
- Save the Widget Area: Click on the “Save” button to save the widget area.
- Add Widgets to the Widget Area: After creating the widget area, you can add widgets. Go to “Appearance” > “Widgets” in your WordPress admin dashboard. Look for the newly created widget area and add desired widgets to it. Configure the devices as needed.
- Assign the Widget Area to the Menu: Go back to the “Menus” editor by navigating to “Appearance” > “Menus.” Select the menu where you want to add the widget area or create a new menu. Drag the “Max Mega Menu Widget” to the desired location within the menu structure.
- Configure the Widget Area in the Menu: After adding the widget area to the menu, click on it to configure its settings. Select the widget area you created earlier from the dropdown list.
- Save the Menu: Save the menu to apply the changes.
By following these steps and using the Max Mega Menu plugin (or a similar plugin), you can add a widget area to your WordPress menu. This allows you to display dynamic content and functionality within your menu structure, such as a search bar, social media icons, or custom widgets.
Why is my widget area not showing in WordPress?
If your widget area is not showing in WordPress, there could be several reasons for this. Here are some standard troubleshooting steps you can take to resolve the issue:
- Check Theme Support: Ensure your theme supports widget areas and has the necessary code to display them. Some articles may not have built-in support for widget areas or may require you to activate them through theme settings or customization options.
- Verify Widget Area Registration: If you have added the widget area manually by editing your theme files, double-check the registration code for the widget area. Make sure you have registered the widget area correctly using the
register_sidebar()function or a similar method. - Activate Widgets: Ensure that you have added widgets to the widget area. If the widget area is empty or contains no devices, it may not be displayed on your site. Go to “Appearance” > “Widgets” in your WordPress admin dashboard and verify that you have added widgets to the appropriate widget area.
- Check Widget Area Visibility: Some themes or plugins may provide options to control the visibility of widget areas based on specific conditions, such as certain pages or post types. Check your theme’s settings or any related plugins to ensure that the widget area is set to be displayed on the pages where you expect it to appear.
- Verify Theme Compatibility: In some cases, widget areas may not work as expected if there are compatibility issues between your theme and specific plugins or WordPress versions. Ensure that your article is up to date and compatible with the performance of the WordPress you are using. If the issue persists, try temporarily switching to a default WordPress theme (such as Twenty Twenty-One) to see if the widget area appears correctly. If it does, it indicates a compatibility issue with your current theme.
- Clear Caches: If you have a caching plugin or server-side caching enabled, it’s possible that the widget area changes are not being reflected due to cached content. Clear any caching plugins or server caches to ensure the latest changes are visible.
- Check for JavaScript Conflicts: Widget areas may rely on JavaScript functionality to work correctly. Ensure that no JavaScript conflicts are caused by other plugins or custom code on your site. Disable other plugins temporarily and check if the widget area appears. If it does, re-enable the plugins individually to identify the conflicting plugin.
Going through these troubleshooting steps, you should be able to identify and resolve the issue preventing your widget area from showing in WordPress.